Minisol on spetsiaalne aerosooltulekustuti, mille on turule toonud meie ettevõte, ja on avalikkuse poolt laialdaselt tunnustatud.
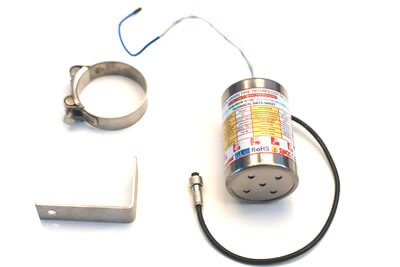
Selle väliskesta materjal on tippkvaliteediga 304 roostevabast terasest toru, mis on väga vastupidav. Toote kuju on nagu ümmargune tünn, ainulaadne on ka sellise silindrilise toote kokkupanek ja paigaldusmeetod.
meie MINISOOL aerosoolid on tuntud oma väikeste ja ruumisäästlike omaduste poolest, Sellest on saamas standardkonfiguratsioon tulekahjude kustutamisel väikestes suletud ruumides.
Mõned kliendid on andnud meile tagasisidet, et nad ei tea, kuidas kronsteini ja kruvisid kokku panna, ja ei tea, kuidas aerosooligeneraatorit paigaldada.
Teoreetiliselt, tehnikud saavad paigaldada vastavalt juhendis toodud juhistele, aga praktikas, paigaldajad teevad sageli vigu.
Aga tegelikult, selle tulekustutustoote paigaldamine ja kokkupanek on samuti väga lihtne, tahaksime seda probleemi siin konkreetselt kirjeldada ja selgitada.
Montaaži- ja paigalduspersonali konfigureerimine
Paigaldus- või montaažipersonal peab olema järgmist tüüpi:
- Kvalifitseeritud professionaalne paigalduspersonal.
- Küpsed tehnilised töötajad, kes mõistavad tööpõhimõtet ja paigaldusküsimusi.
- Spetsiaalselt koolitatud töötajad, kes mõistavad vooluringe, ning oskab teha montaaži- ja paigaldustöid.
Märge: Kui te ei tea, kuidas seda aerosoolil põhinevat minisooltulekustutit paigaldada, saate tellida professionaalselt paigaldusettevõttelt, kes aitab selle installida.
Kuidas selle aerosooltulekustuti kronsteini ja kruvisid kokku panna
Esiteks, loetleme konkreetse materjali:
- Minisoolaerosool tulekustuti korpus.
- Pistik või pistikühendus.
- Traat või termojuhe.
- Klamber.
- Mittestandardsed iselukustuvad kruvid.
- “L” Kuju või “U” Kuju paigaldusklamber.
- Lame padi.
- Vedrupadi.
- Kuusnurksed kruvid.
- Käivituskomponendid: lennunduspistikud, termoklaasist pirnid välised termojuhtmed, jne.
Teiseks, Kokkupaneku etapid on järgmised:
- Samm 1: Kontrollige, kas montaažitarvikud on komplekteeritud.
- Samm 2: Asetage rõngasklamber aerosooltulekustutusseadmele ja paigaldage mittestandardsed kruvid.
- Samm 3: Ühendage L- või U-kujuline klamber kruvide ja mutritega klambriga.
Kolmandaks, kruvide ja kronsteinide materjalide valik:
- Klambri ja kruvi materjalil peaks olema korrosioonivastane funktsioon.
- Klambri paksus peaks olema vähemalt 2 millimeetrit.
- Kruvidel peaks eelistatavalt olema vibratsiooni- ja eraldumise vastane funktsioon.
- Peaks suutma kanda üle raskust 100 kilogrammi.
- Vigastuste vältimiseks tuleb pind passiveerida.
Täpsemad tarvikute joonised ja paigaldusjuhised, palun vaadake minisooli aerosooli kasutusjuhend.
Neljandaks, kasutades ülalkirjeldatud materjale, monteerige kronstein samm-sammult kokku vastavalt järgmises videos olevatele juhistele:
Minisooli aerosooltulekustuti paigaldamine
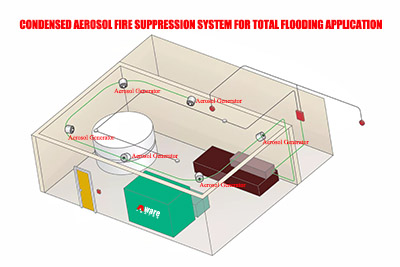
Aerosoolkustutite paigaldamise meetod on väga lihtne, lihtsalt kasutage tööriistu, et kinnitada see paigalduskoha seinale või lakke. Põhilised installietapid on järgmised:
- Leidke sobiv paigalduskoht külgseintel või laes.
- Paigaldusava asukoha määramiseks kasutage elektritrelli ja loodi.
- Kinnitage toode kinnitusklambriga siseküljele või lakke.
- Reguleerige toote otsiku suunda ja suunda, ja korraldage soojus- ja vooluringid korralikult.
- Kui see on paigaldatud 3M liimi või magnetiga, sulgusid ja kruvisid pole vaja. Lihtsalt kleepige toode lae siseküljele või ülaosale.
Minisoolaerosooltulekustutil on erineva võimsusega, mahutavus 30 juurde 500 grammi L-kujulise toega ja, mahutavus 750 juurde 5700 grammi U-kujulise toega.
Valige erinevad võimsused ja erinevad režiimid, palun vaadake seda lehte Minisol aerosool tulekustuti.
Lahendus kokkupaneku või paigaldamise ajal puuduvate tarvikute jaoks
Kui toote kokkupanemisel või paigaldamisel puuduvad tarvikud, lahendus on järgmine:
- Esiteks, kontrollige, kas teie ettevõttel on puuduvate osade jaoks varuosi, või kui on võimalik neid osta otse kohalikult turult.
- Kui mitte, kontrollige esmalt aerosooltulekustutite tarvikute mudeleid, ja seejärel teatage kohalikule edasimüüjale või tootjale, tootja või edasimüüja annab puuduvad paigaldustarvikud tasuta.
Erinevad tulekustutusaine komponendid vastavad erinevatele klambrimudelitele. Meie klambrimudelid on järgmised:
| Minisooli aerosooli generaatori võimsus |
Klambrite mudel |
| 20 juurde 30 grammi |
52-56 |
| 60 juurde 100 grammi |
74-79 |
| 150 juurde 200 grammi |
98-103 |
| 250 juurde 500 grammi |
122-130 |
| 750 juurde 1000 grammi |
162-174 |
| 1500 juurde 5700 grammi |
214-226 |
Erinevate tulekustutusomadustega MINISOLil on erinevad kronsteini pikkused, palun vaadake järgmist loendit:
| Minisooli mahutavus |
Klambri pikkus |
| 20 juurde 60 grammi |
120 CM |
| 100 juurde 500 grammi |
165 CM |
| 750 grammi kuni 5700 grammi |
220 CM |
Tuleb rõhutada, et kronsteini pikkust saab spetsiaalselt kohandada, Kliendid saavad meile esitada joonised, ja meie tootmistöötajad ja tehnikud saavad rangelt projekteerida ja toota vastavalt joonistele.
Paigaldamine eritingimustel: Magnet koos 3M kahepoolse teibiga
Mõnel spetsiaalsel kinnisel alal, nagu rauast jaotuskapid, selle toote paigaldamist saab teha ilma sulgude ja kruvideta, selle asemel kasutatakse magneteid ja 3M kahepoolset liimi, nagu on näidatud järgmisel joonisel:
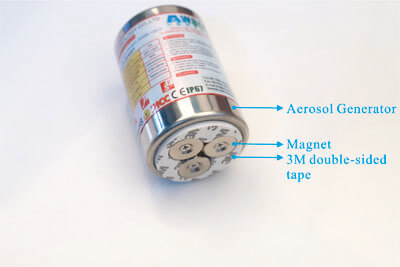
See paigaldusviis on lihtsam, lihtsalt kleepige toode raudplaadile. (Märge: See paigaldusviis sobib ainult aerosooltulekustutitele, mille kustutusvõime on kuni 500 grammi. Suuremad tulekustutid võivad pärast paigaldamist seinalt maha kukkuda).
tavaliselt, ära kasuta paigaldamisel magneteid+3M liimi, kuid paigaldamiseks kasutage klambreid ja klambreid, Kuna klambrid ja klambrid on kindlamad.
Ettevaatusabinõud kokkupanekul ja paigaldamisel
- Lahtipakkimiskontroll enne montaaži- ja paigaldustöid, Kontrollige, kas tarvikud on komplektsed, sisaldab täielikku tarvikute loendit: kasutusjuhend, vastavussertifikaat, silt, aerosooltoote korpus, elektrilise starteri lennupistik, termojuhe, termoklaasist pirn, paigaldusklamber ja kruvi.
- Klambrite kokkupanemisel, klambrid, ja kruvid, pöörake tähelepanu iga komponendi montaažijärjestusele ja asukohale ning ärge paigaldage neid valesti.
- Paigaldamise ajal, veenduge, et sein või lagi on vastupidav ja kindel, et vältida aerosoolkustutusseadme lahtitulemist ja mahakukkumist.
- Ärge lülitage installimise ajal toidet sisse, ära süüta termotraati, ja ärge purustage termoklaasist pirni.
- Montaaži- ja paigaldustööd peaksid eelistatavalt tegema kvalifitseeritud töötajad.
- Paigaldamise ajal, paigalduspersonal peab olema varustatud professionaalsete paigaldustööriistadega ja kandma kindaid.
- Pärast paigaldamist, kontrollige uuesti, kas toode on kindlalt paigaldatud.
- Enne paigaldamist, Lugege juhend läbi ja mõistke hoolikalt ettevaatusabinõusid.
- Kui mõned komponendid nõuavad klientide poolt spetsiaalset töötlemist, nad peavad esitama konkreetsed nõuded või esitama joonised. Saame komponente edasi töödelda vastavalt erinõuetele ja joonistele.


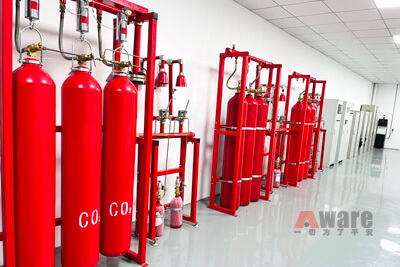 Süsinikdioksiidi tule mahasurumine: Põhisüsteemi sissejuhatus
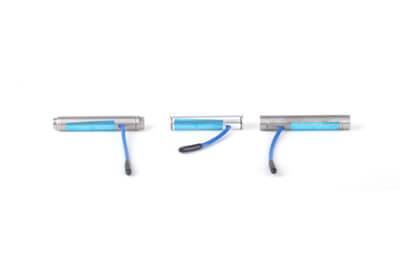 2G Pocket Fire kustuti: Peamised rakendusvaldkonnad ja väljavaated
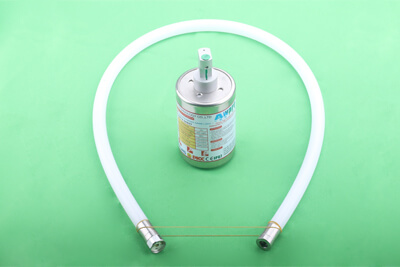 Tulekahju tuvastamine ja aerosool, Mis on parem süsteem?